


Presta Valve Explained: How It Works & How to Pump It Up
- August 20, 2026
- 0
If you’ve stared at the thin, spindly valve poking out of your bike’s wheel and wondered what on earth it is, you’ve found a presta valve, and it’s



9621 Agnes Crossing, Lake Suzanneview, New Mexico Island 84604-9295.
If you’ve stared at the thin, spindly valve poking out of your bike’s wheel and wondered what on earth it is, you’ve found a presta valve, and it’s
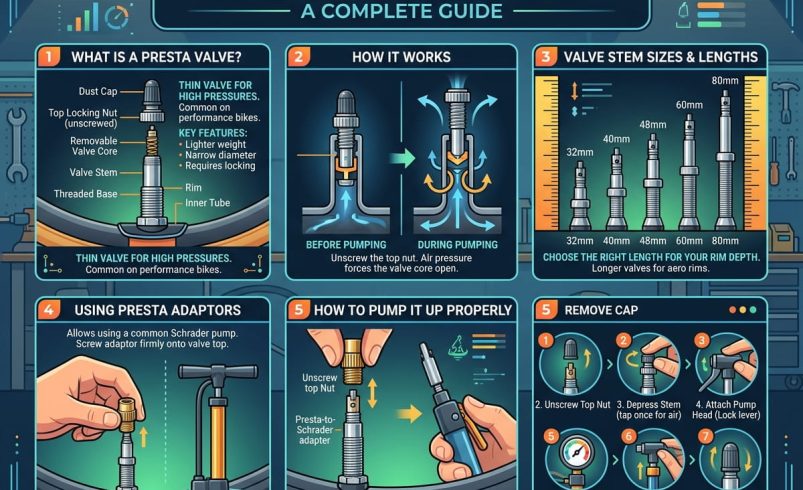
If you’ve stared at the thin, spindly valve poking out of your bike’s wheel and wondered what on earth it is, you’ve found a presta valve, and it’s the narrow, high pressure valve fitted to most road bikes, gravel bikes and higher end mountain bikes in the UK. Unlike the fatter car-style valve you’ll know from a Ford Fiesta, a presta valve has a small threaded lock nut at the tip that you unscrew before pumping, and it seals using nothing but the air pressure inside the tube pushing back against it.
This guide covers everything: how a presta valve actually works, the difference between presta and schrader valves, how to pump one up without a fight, what to do when the nut sticks or the pump won’t grip, valve lengths for deep-section wheels, and the tools worth carrying. Whether you call it a French valve, a thin bike tyre valve, or just “that weird valve,” you’ll know exactly what to do with it by the end.
A presta valve is a narrow, high pressure bicycle tyre valve with a threaded stem and a small knurled lock nut at the very top. It’s sometimes called a French valve, since it was developed in France, and it’s the standard fitment on most road bikes, gravel bikes and a fair number of performance mountain bikes sold in the UK today.
At just 6mm in diameter, a presta valve is noticeably thinner than the 8mm Schrader valve found on cars and cheaper bikes. That narrower profile matters more than it sounds: it means the hole drilled into the rim can be smaller too, and since the valve hole is usually the weakest point on a bicycle rim, a smaller hole keeps a lightweight rim stronger. This is exactly why presta valves dominate on performance wheels where every gram and every bit of structural integrity counts.
This is the bit that confuses most people, so it’s worth explaining properly rather than just saying “unscrew it and pump.”
A presta valve doesn’t use a spring to stay shut, which is the key difference from a Schrader valve. Instead, it relies entirely on air pressure: the higher pressure inside the inner tube pushes the tiny valve core closed against the lower pressure outside it. The lock nut at the top isn’t what keeps air in day to day, it’s there as extra insurance, and mainly to stop dust and dirt working their way into the valve mechanism over time.
When you want to inflate the tyre, you unscrew the lock nut fully, which frees the internal valve pin so it can move. The valve stays closed on its own at this point, since nothing is pushing it open yet. Once you attach a pump and start pushing air in, the increased pressure from the pump forces the valve open, air flows through, and the moment you stop pumping and remove the pump head, the tube’s own internal pressure pushes the valve straight back shut.
This comparison comes up constantly, and it’s worth laying out plainly rather than just saying “one’s for road bikes.”
| Feature | Presta valve | Schrader valve |
| Diameter | 6mm | 8mm |
| Closing mechanism | Air pressure only | Spring loaded pin |
| Typical pressure range | Up to around 8 bar (roughly 116 psi) | Around 2 to 3 bar (roughly 29 to 44 psi) |
| Common on | Road, gravel and high-end mountain bikes | Car and cheaper hybrid or city bikes |
| Pump compatibility | Needs a presta-specific head or adaptor | Compatible with car pumps and petrol station air lines |
| Rim hole size | Smaller, better for lightweight rims | Larger |
Presta’s narrow, threaded design lets it handle much higher pressures than Schrader, which is exactly why road cyclists running 80 to 100 psi tyres rely on it. Schrader’s big advantage is universality: if you’re stuck without a pump, almost any petrol station air line or car pump will work on it, whereas a presta valve needs the right head or a cheap adaptor.
If you’ve never seen one, a dedicated presta pump head looks noticeably different from a standard car-style pump head.
A presta-specific pump head is usually narrower and often has a small screw-on or push-fit collar that clamps directly around the thin presta stem, rather than the wider push-and-hold design used for Schrader valves. Many modern track pumps and hand pumps now come with a dual-head or switchable design, sometimes called a “dual valve” head, where you flip an internal core around or twist a dial to switch between presta and Schrader compatibility. If your pump only has one fixed head and it’s designed for car tyres, it almost certainly won’t grip a presta valve properly without an adaptor.
Once you know the sequence, this takes under a minute.
A few issues come up again and again with presta valves, and most have simple fixes.
The valve seems stuck and won’t accept air. This is almost always down to forgetting to unscrew the lock nut fully before attaching the pump, it’s the single most common mistake new cyclists make. Double check the nut is unscrewed all the way, then try the tap-and-burp step again before pumping.
Air hisses out when I remove the pump. A small hiss on removal is entirely normal, since disconnecting the pump momentarily equalises pressure in the connector. If you’re losing a noticeable amount of pressure from the tyre itself, check the lock nut is tightened and the valve core isn’t loose.
The pump head won’t grip the valve properly. This usually means your pump is set up for Schrader rather than presta, or the valve stem is at an angle. Check whether your pump has a switchable core, and make sure the pump head is sitting perfectly straight on the stem before you lock it down.
The valve core has come loose or needs replacing. On some tubes and most tubeless setups, the valve core can be unscrewed entirely using a small valve core tool, useful for adding tubeless sealant but also a common cause of slow leaks if it’s not screwed back in tightly. A dedicated valve core removal tool, widely available from UK cycle shops, makes this straightforward.
This is a genuinely useful bit of knowledge that a lot of first-time buyers miss entirely.
Presta valves come in a range of stem lengths, typically from around 36mm up to 80mm, precisely because wheel rim depths vary enormously. The rule of thumb, confirmed by valve manufacturers, is that the valve stem should extend at least 10mm to 15mm beyond the depth of your rim, otherwise your pump head simply won’t have enough exposed stem to grip properly. A standard 40mm or 48mm valve is fine for most everyday wheels, but deep-section aero rims, common on performance road bikes, often need 60mm or even 80mm valves to poke through far enough.
If you’ve already got tubes with valves that are too short for a new set of deep-section wheels, you don’t need to buy entirely new tubes. Valve extenders, small threaded add-on pieces that screw onto the existing valve core, are inexpensive and widely stocked by UK cycle retailers specifically to solve this problem.
A few cheap bits of kit solve almost every presta-related headache you’ll encounter on the road.
Prices for these vary by brand and retailer, so it’s worth checking current stock at Halfords, Evans Cycles or your local bike shop rather than assuming a fixed cost, but presta adaptors and valve tools are generally inexpensive, low single-figure pounds for a basic brass adaptor up to around £10 to £15 for a quality branded valve core tool.
A presta valve is used to inflate bicycle tyres, particularly on road bikes, gravel bikes and higher-end mountain bikes that run higher tyre pressures. Its narrow, threaded design handles pressures up to around 8 bar and requires a smaller hole in the rim, keeping lightweight wheels stronger.
Look at the valve stem poking through your rim, a presta valve is thin (around 6mm), often threaded, and has a small knurled lock nut at the very tip that unscrews. A Schrader valve, by contrast, is wider, shorter and looks identical to the valve on a car tyre.
Not directly, a pump designed purely for the wider Schrader valve won’t grip or seal on a presta stem. You’ll need either a pump with a presta-compatible or switchable head, or a cheap screw-on adaptor that converts the presta valve to accept a Schrader pump.
The most common cause is forgetting to unscrew the small lock nut at the top of the valve stem before attaching the pump. Unscrew it fully, tap the valve gently to release a small hiss of air and confirm it moves freely, then try pumping again.
This depends on your tyre and riding style rather than the valve type itself, road tyres commonly run 80 to 100 psi while gravel and mountain bike tyres typically run much lower, often 25 to 45 psi. Check the sidewall of your specific tyre for the manufacturer’s recommended pressure range.
Make sure the lock nut is tightened finger-tight after pumping, and check the valve core itself isn’t loose, since these can work loose over time, particularly on tubeless setups. A dedicated valve core tool lets you tighten the core securely without over-torquing it.
Your valve stem should extend at least 10mm to 15mm beyond the depth of your rim so your pump head has enough exposed stem to grip. Standard rims usually need a 40mm to 48mm valve, while deep-section aero rims often require 60mm or 80mm valves, or a valve extender.
Neither is objectively better, they suit different priorities. Presta is lighter, handles higher pressure and suits performance wheels, while Schrader is more universally compatible with pumps and petrol station air lines, making it a practical choice for casual or commuting bikes.